Automate document management with Power Automate and SharePoint. How to create a document archive by year and entity
The scenario is common to many companies: they receive hundreds or thousands of documents per year from their suppliers and want to automate the archive according to their business rules. This facilitates organization, auditing, research and internal control. In this article, we'll look at how to create an automated archiving solution with Power Automate and SharePoint.
The first step is to create a repository, be it a SharePoint document folder, where supplier invoices will be stored. This stage of the process can be automated in several ways:
- by creating an email where all attachments will be collected and filed in an inbox folder,
- through an app, where someone uploads these documents as they arrive,
- through another automation flow that stores documents, when they are classified as approved,
- There are many opportunities to automate document inbound.
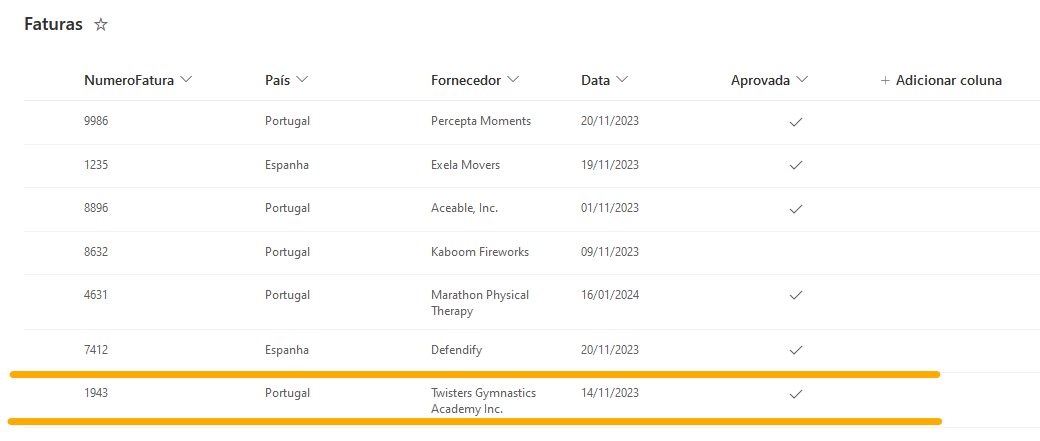
In fact, this process can be much longer than what we are describing in this post, but let's start by creating a list in SharePoint and consider it as our starting point:

Let's assume that the documents arrive at this list from all the company's suppliers and that our objective is to organize them first by year (assuming the year as the date of arrival of the documents) and, within each year, by supplier .
It is also intended to rename each of the documents to the following nomenclature:
- document number
- underscore
- supplier's name
The documents will be saved in the list and we will add columns to it with the meta date necessary to automate the process. We would have, for example:
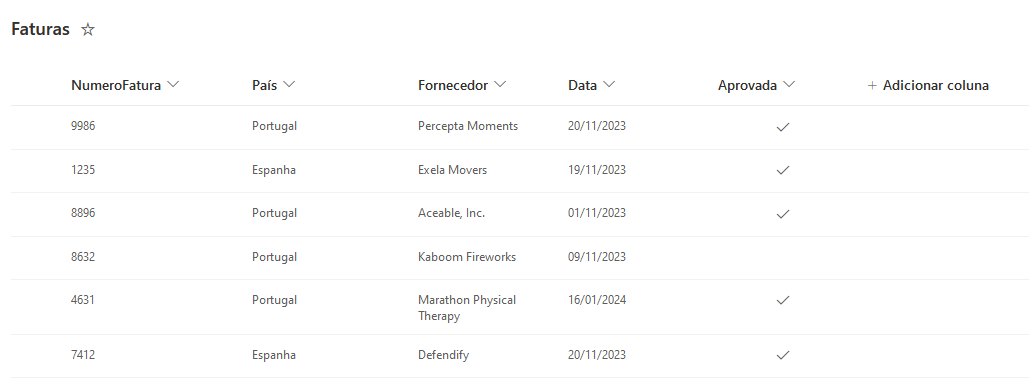
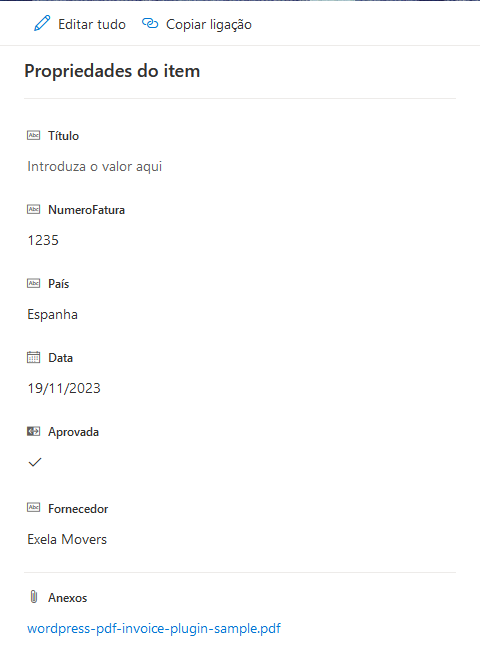
In a real scenario, we would have many other columns with more information relevant to classifying documents. Attachments are stored in the list itself and can be seen if we open one of the items. For example, document number 1235 could be accessed from the right-hand panel:
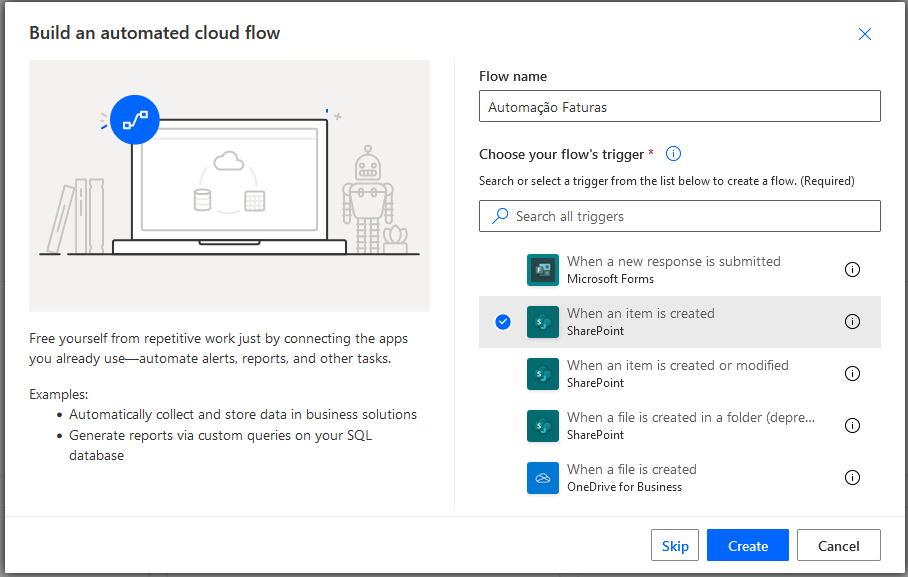
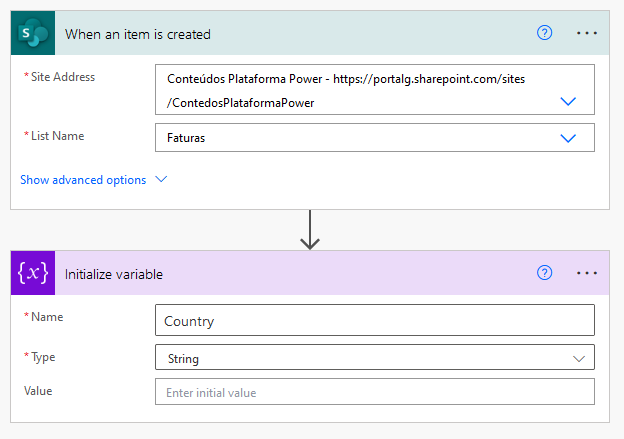
The automation flow will be activated the moment an item is added to this list. Therefore, in Power Automate, the trigger will be: “When an item is created”:
The first step is to identify the country to which the invoice relates. To do this, let's start by adding an action with the initialization of a variable, be it the variable “Country”, with the type “String”, that is, a text variable:
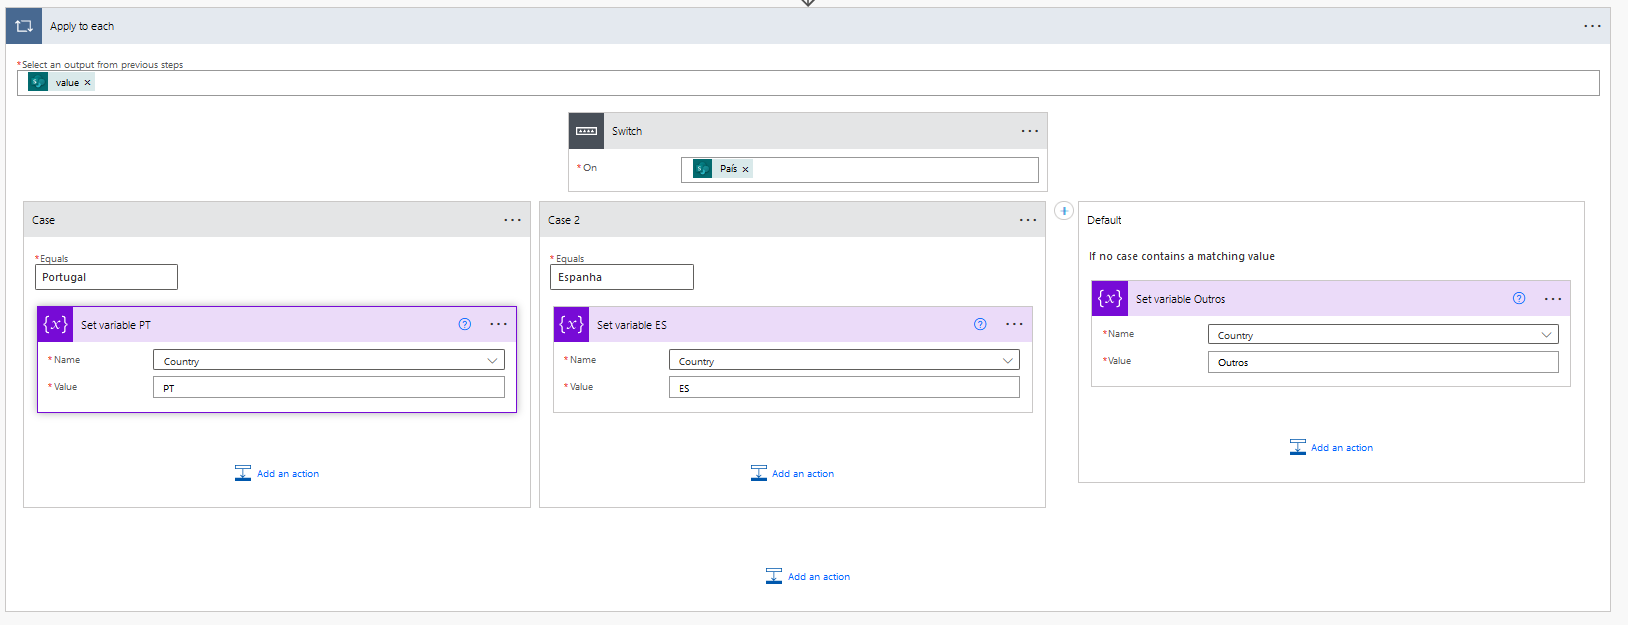
Our list only contains two countries: Portugal and Spain, but we will design the automation flow to allow more countries to be included. To do this, we will add a Switch action, which will analyze the Country field in the list and set the Country variable to the respective acronym. If the country is not considered in the Switch action, the variable may be empty and the flow may end, or it may be set to “Others”, with the invoices being stored in a directory with the same name.
This action may be useful to deal with situations where the country name is incorrect or when the company has a supplier from a new country that has not yet been classified. Subsequently, a new automation flow could be created with a notification via email for the responsible person to be aware of and act on these types of cases.
First step – collect document data
As we can see in the following image, the Switch action will be “wrapped” in a “Apply to each” loop because it will be executed each time one (or more) items are created in the SharePoint list:
The next variable to initialize will be the year and here we can choose to consider the year referring to the date of the document or the year in which the document was uploaded to the list, depending on the business rule determined by the company.
Let's take the second option and add a new action: “Initialize variable”:
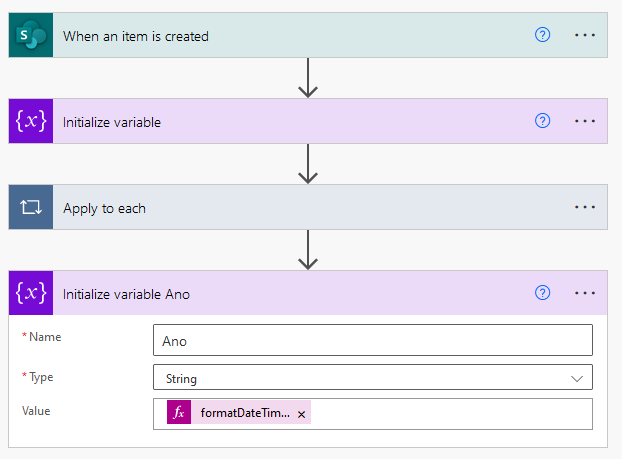
The expression we use to initialize this variable is:
formatDateTime(utcNow(), 'yyyy')
Basically, this function creates a “timestamp” of the current moment (in which the flow is executed) and converts it into year format. For example, today is November 20, 2023 and the variable will be set to 2023, in text form.
It is this text that we are interested in creating the structure of the invoice file later in the definition of this automation flow.
The variable with the name of the supplier follows, but in this step we will be careful. Let's assume that there may be some ambiguity in the names of suppliers and that the name of the same supplier may appear several times in different ways. For example, in uppercase and lowercase, with accentuation, without accentuation, etc.
Therefore, let's start by initializing a new variable “SupplierName” and setting it with the value that comes from the SharePoint list, but converted to lowercase and without periods:
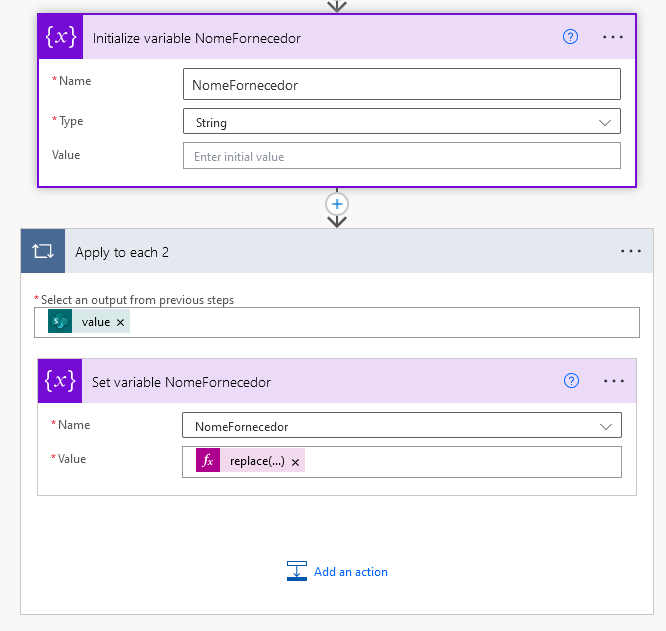
The expression contained in the last “Set variable” action is as follows:
replace(toLower(items('Apply_to_each_2')?['Fornecedor']), '.', '')
Let's test the flow with the entry of a new invoice:
Analyzing the execution of the flow, we verified that the variables Country, Year and SupplierName (NomeFornecedor) were correctly defined:
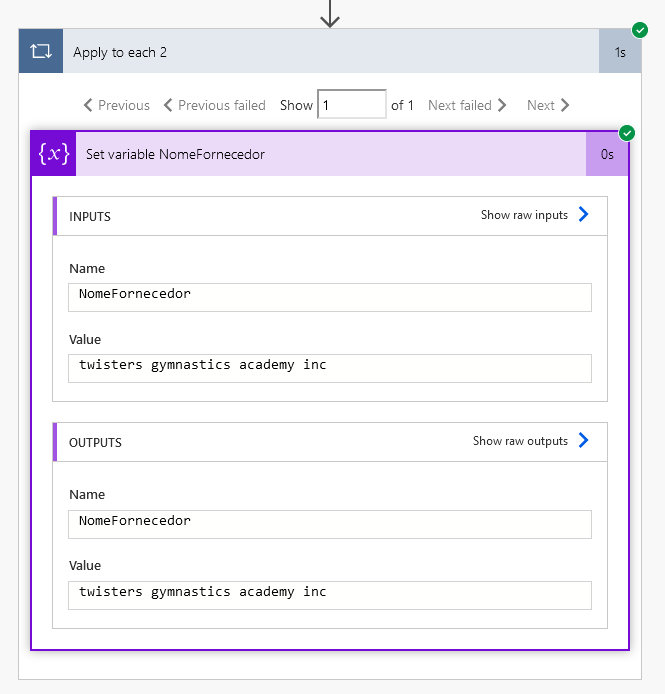
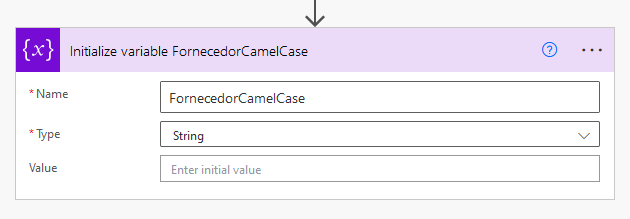
As we can see in the image above, the supplier's name is now free of punctuation and all in lowercase. We could go a little further and convert this text into “camel case”, that is, convert each word to capitalization and join all the words into one.
To do this, we will initialize the variable “SupplierCamelCase” as an empty string:
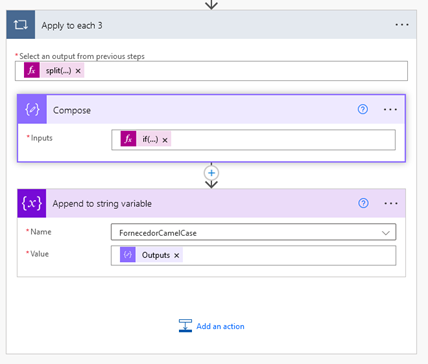
In the next action, we will convert the supplier name into an array, using the split function to separate the supplier name as it is in spaces. The expression is as follows:
split(variables('NomeFornecedor'), ' ')
The supplier name is now divided into four words. So, let's once again wrap the result of the above expression in an “Apply to each” loop to treat each word separately.
For each word, we will apply a “Compose” action that will perform a logical test. If the word size is just one character, it will be converted to uppercase. Otherwise, only the first character of the word will be capitalized. The expression will be:
if
(
equals(length(item()),1),
toupper(item()),
concat(first(toupper(item())),toLower(substring(item(),1,sub(length(item()),1))))
)
Finally, each word converted to capitalization is attached to the “SupplierCamelCase” variable to generate a single word.
We can visualize the result so far in the designer:
And testing the flow so far with the same data, we would see the result:
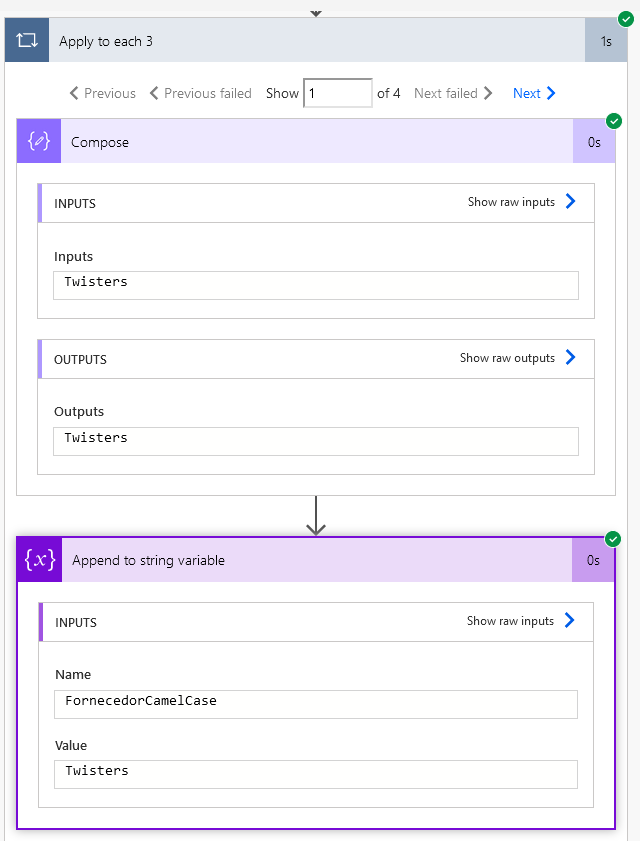
As we can see above, the Apply to each loop contains four loops, one for each word, and each of them capitalizes the first letter.
Second step – send the document to the SharePoint document folder
Once we have reached this point, all we have to do is send the document from the list to the SharePoint document folder. However, we want to do it with the correct structure and naming.
The first thing we are interested in is whether the folder in which we want to file the document already exists. If it doesn't exist, we will have to create it. To do this, we will add an action “Send HTTP request to SharePoint”. The SharePoint API will return True or False as appropriate.
So, the next action would be:
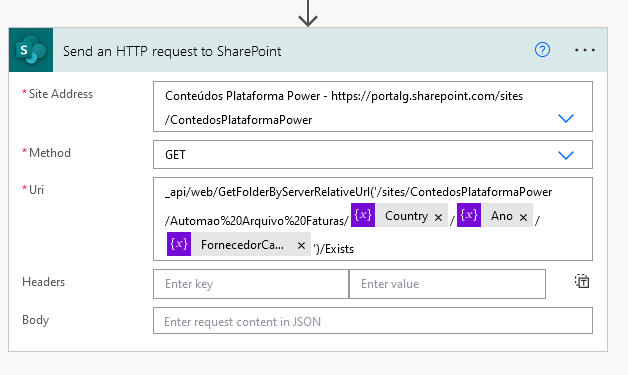
In the “Site Address” field we enter the SharePoint site that we created for this project.
The selected method is GET, as we are just getting a response from the server.
And the “Uri” field is the most complex and in it we will use a fixed part of text and a variable part with the logic of the folder structure that we intend to create. Within the document library “Invoice File Automation” we will test whether there is a directory with the structure “/Country/Ano/SupplierCamelCase.
Testing this flow once again with the same input data we have:

As expected, the result is false, as we have not yet created the folder we are interested in. This is what we will do next: add a condition to evaluate the existence of the directory and the actions to create the folder, if it does not exist yet:
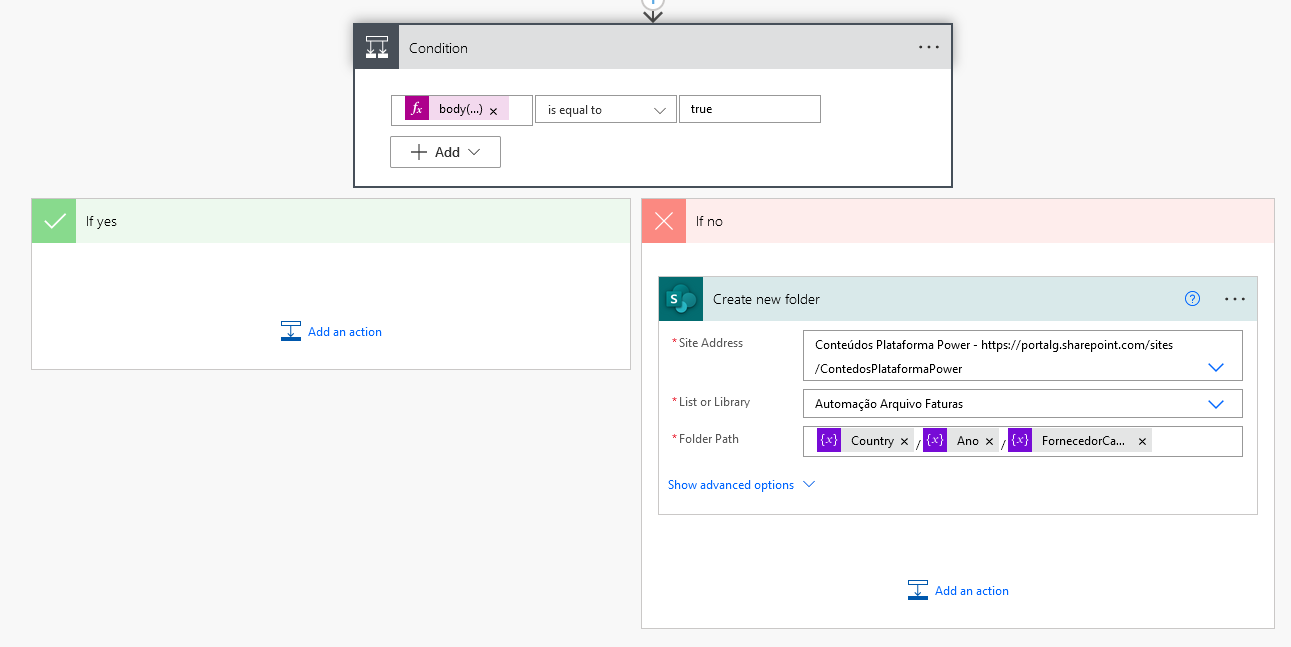
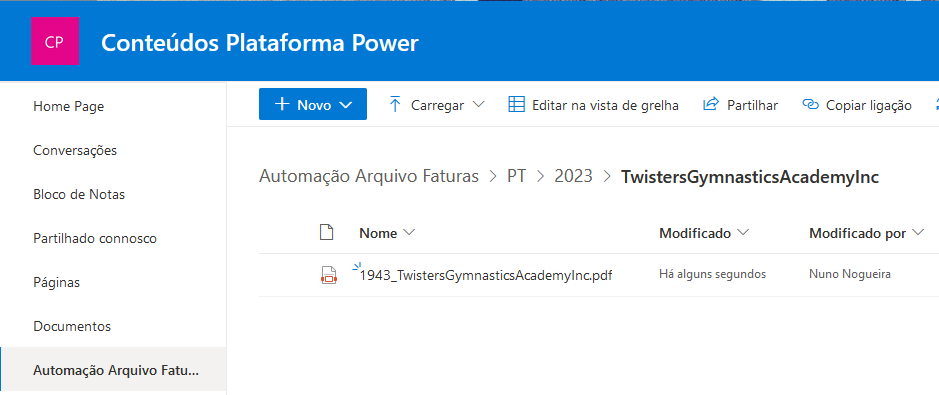
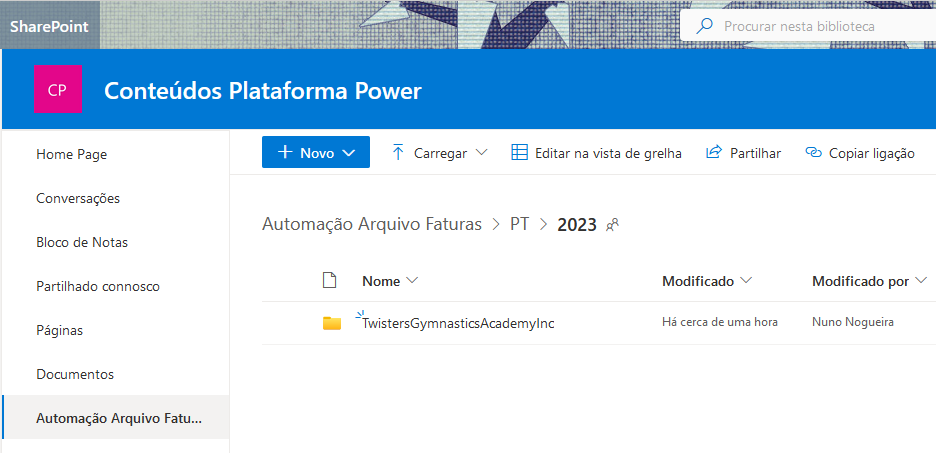
Running the flow, we verify that the directory is created according to the intended structure. In our document library “Invoice File Automation”, the “PT”, “2023” and “TwisterGymnasticsAcademyInc” directories were created:
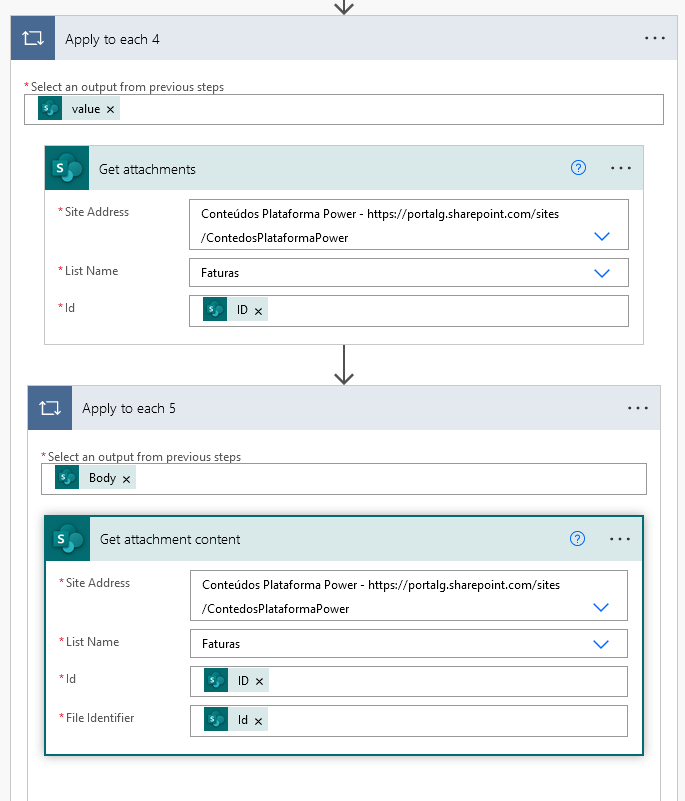
As you would expect, if we run the flow again with the same input data, nothing will happen, as the directory already exists. It is, however, important to note that, even if the result of the above logical condition does not result in a direct action, the flow continues, as the rest of the process has not yet occurred: we still have to file the document in this folder. So, let's add a new action to the flow, to get the SharePoint list attachment.
To do this, we need two actions:
- a first, to obtain the attachments of the list item that triggers the flow (each item in a SharePoint list can contain more than one attachment)
- and the second, which obtains the content of each attachment, which can be copied to any other location, sent by email, etc.
Note that as each item can contain more than one attachment, both actions were within “Apply to each” loops, although, in the case we are analyzing, there is only one document in question.
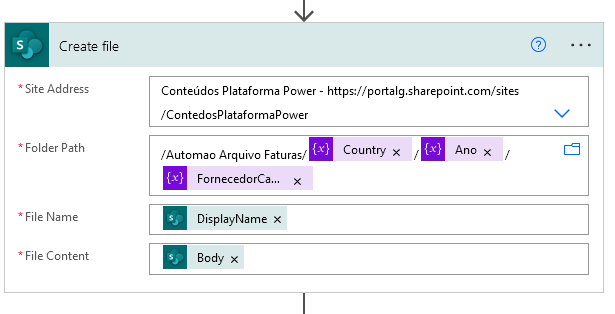
In the next step, we will create the file in the document library, in the desired directory but still with the original name:
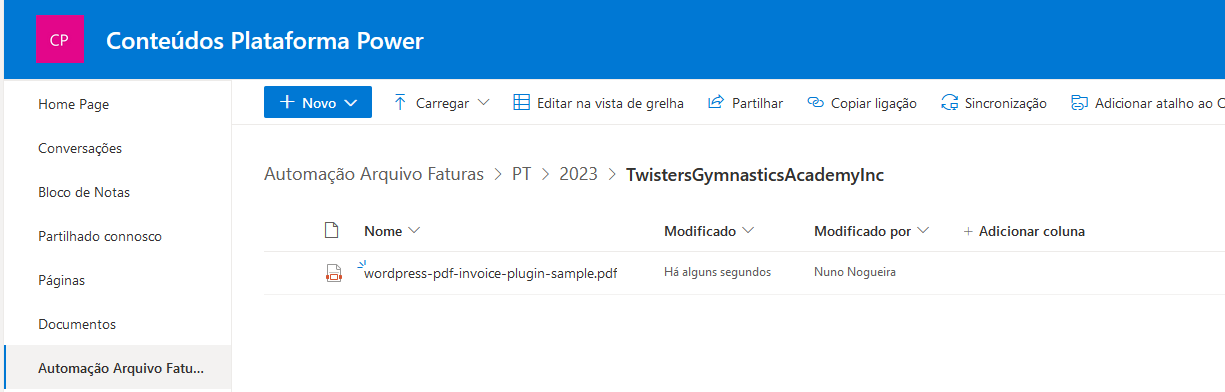
We can see in the document library that the file was created:
We can consider this file as temporary and create a permanent one with the correct name based on it. To do this, we need some actions:
- get file extension
- create the final file with the desired name and extension
- delete the temporary file
In the designer we can visualize these actions:
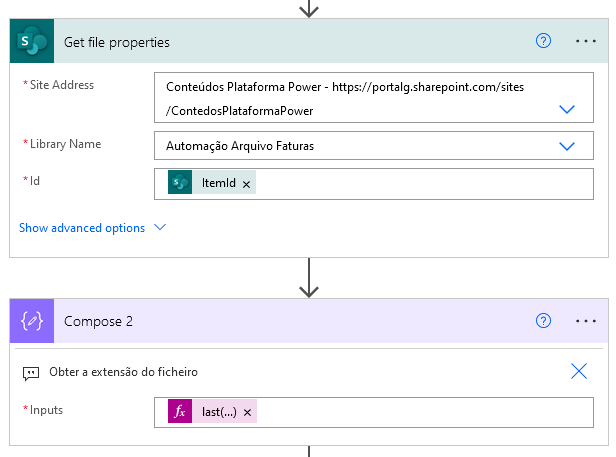
In the first action, we are collecting the properties of the previously created file. The expression that obtains the file extension is in the second “Compose” action and is as follows:
last(split(outputs('Get_file_properties')?['body/{FilenameWithExtension}'],'.'))
Finally, the last two actions are as follows:
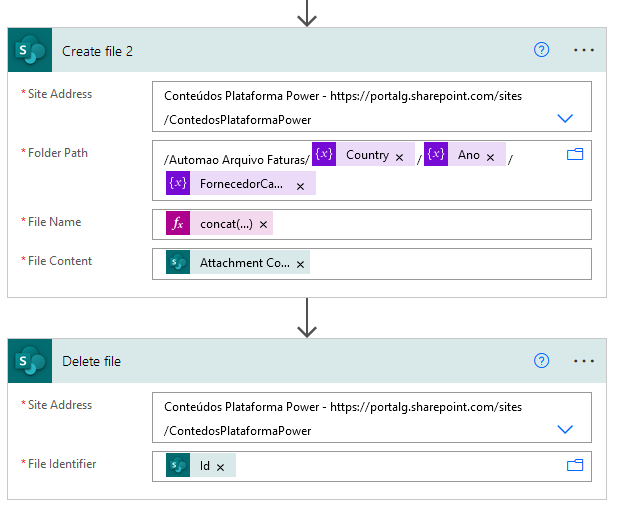
The creation of the definitive file in the same directory but with the desired nomenclature, which is given by the expression:
concat(items('Apply_to_each_4')?['NumeroFatura'], '_', variables('FornecedorCamelCase'),'.',outputs('Compose_2'))
And the last action of this automation flow deletes the temporary file.
As we see in the following image, the document has been added to the SharePoint document library: